Ajqvue Manual
Copyright © 2024 Dana M. Proctor
June 2024
1 Introduction
Ajqvue provides an easy to use Java based interface for
viewing, adding, editing, or deleting entries in a Apache Derby, H2, HyperSQL,
Microsoft SQL, MSAccess, MariaDB, MySQL, Oracle, PostgreSQL, or SQLite
database. All user tables and basic data type fields are available for
access in the selected database. Ajqvue only needs two other pieces
of code, the JRE, Java Runtime Environment, and a JDBC,
Java Database Connectivity, driver. The JDBC provides the interface
between the Java SQL statements, and the database. The JDBC driver for
MariaDB is called mariadb-java-client, MySQL is Connector/J, MSAccess
ODBC-JDBC bridge, Oracle, and Derby just JDBC, and PostgreSQL JDBC4.
*The
H2, HSQL, SQLite databases are now fully integrated into the Ajqvue
application as libraries so those JDBCs need not be installed. The
Connection Manager for Ajqvue has been given default entries to help
the user select the proper configuration for the desired database access.
The application has been purposely built to provide data access and is
not primarily a database management tool, but a database administrator
may find it extremely helpful. If filtering for tables is turned off then
access to all system tables can be achieved for an administrator login.
All users including small to medium size businesses will find setup and
using the tool to be simple and straight forward. The application once
installed can provide a much quicker access/update to a database than
a web based interface frontend and Ajqvue supports transaction locking.
If you want to quickly access a local or server based database for viewing,
editing, searching, and analyzing data Ajqvue provides an alternative
that is simple and easy to use.
Bold text and a vertical bar are used to denote menu commands. File | New, for example, means to select the New command from the File menu. This notation is used to refer to other sections within this manual as well. In the above example, you can find information by looking for New under the File Menu Commands section. If the first word is Start, select the command from the Windows task bar menu structure.
* A asterisks emphasizes helpful information and techniques.
! An exclamation mark emphasizes warnings and other important information.
2 Getting Started
The minimum system requirements for Ajqvue are:
If a UNIX or Linux OS is used then a X-Windows environment will need to be configured and used. Ajqvue is a windowed GUI, graphical user interface.
The tested databases supported by Ajqvue are:
Installation From a Downloaded File
Using a program such as WinZip, 7-Zip, Tar, or similar compression/decompression program for your OS extract the Ajqvue package file to the desired location on the hard disk. On a Windows system this may be any location, but on a Unix or Linux system it will be in the home directory of the user. If multiple users are to access the application then consult with the system administrator of your workstation. The likely location will be in the /usr/local or a public directory, which all users have access to for application execution.
General Installation Instructions
The Ajqvue application is a Java based program
and does require the JRE to be installed. The minimum runtime environment
needs to be JRE-1.8. In addition to the JRE an extension needs to
be installed that allows Java to communicate to the Derby, MS SQL, MariaDB,
MySQL, Oracle, or PostgreSQL database. The programs are available on the
Internet free of charge and for MySQL is called MySQL Connector/J.
The MariaDB driver is called Java Client. The PostgreSQL program is called
JDBC4, MS SQL, Oracle, Derby just JDBC. The jar file for these
extensions use to be able to be installed to the JRE /lib/ext directory, but
now may not depending on your JRE installation. As an alternative Ajqvue
will ask you for a JDBC Driver Library directory if it can not load the
particular driver required for the connection. Place your JDBC drivers in
this specified directory so they may be loaded. Please consult with installation
instructions for these pieces of code from the vendor, or see the Ajqvue
README file for additional information. The exceptions to JDBC installations
are for the Derby database. Derby requires the derby.jar, and derbyclient.jar
files to placed in the Java Extension or specified Driver Library directory.
The H2, HyperSQL, and SQLite databases use an integrated JDBC built
into the application and Ajqvue includes these database so no additional
installation need take place.
The login interface and Connection Manager uses a
XML configuration file for saving user preferences. Upon first running Ajqvue
a reference XML file, ajqvue.xml, located in the installation directory is
read then copied to the user's home directory under a newly created directory,
.ajqvue. DO NOT MODIFY THIS REFERENCE FILE! The newly created
directory On Windows ® 98 will be 'C:Windows\.ajqvue'. On Windows
® XP, Vista, and Windows 7 the new directory will be in the user's home
folder. On a Linux system the new directory will be '/home/user/.ajqvue'.
All saved changes performed in site management will be stored in the XML
file located in the above referenced directory. The user is encouraged
to make a backup of this file on occasional. The .ajqvue directory in
addition to holding the XML configuration file will also contain the file
ajqvue_locale.txt which holds the entry that allows control of language
support.
Ajqvue requires a database to be
setup to communicate with in order to work. It is beyond the scope of this
document for installing and setting up this type of application, but insure
the correct access grant rights are specified for the user and
database tables that are desired to be reached. All databases normally
have some form of privilege configuration for selective control to access
rights. So just because you have local access rights does not mean the
database will let you also login from a remote machine. Remember also that
the Ajqvue application uses TCP/IP, Transmission Control Protocol/Internet
Protocol, for its connection to the database. *
Many of the default installations for these databases limit connections to
just from the local host only.
Adding a Shortcut
To add a Ajqvue icon to your desktop, right
click the mouse pointer on an unused area of your desktop to display the
pop up menu and select New | Shortcut. Choose
Browse, find and double click on the Ajqvue.jar file,
then click on Next. Type in "Ajqvue" for the name
of the shortcut, then click Finish. To run Ajqvue,
either double click on the new Ajqvue icon or use the
Start | Run command.
On a Unix or Linux system a shortcut may be created
in the KDE Desktop environment by right clicking on the desktop and selecting
Create New | File | Link to Application. Give the application
a name such as "Ajqvue" in the General tab. Next select the Application
tab and fill in the description desired then browse to the location on the
disk where the Ajqvue package was installed and select the Ajqvue.jar
file for the Command entry. The Command entry is still not complete and
must contain the Java command. Place before the quoted Ajqvue.jar
entry, "java -jar ". !
Do not place quotes of any kind around this command, the quotes only
contain the Jar file location. Example: java -jar '/home/~user/Ajqvue/Ajqvue.jar'.
Finally select the Work Path as the directory where installation took place.
The Ajqvue application may also be run directly from a command/console window by typing in the command
"java -jar Ajqvue.jar" while in the installation directory. A Linux/Unix environment will require the
file location to be specified by "./Ajqvue.jar", remember this must be done with a console that is running
within a X Window environment like KDE or Gnome.
3 Using Ajqvue
Login Access
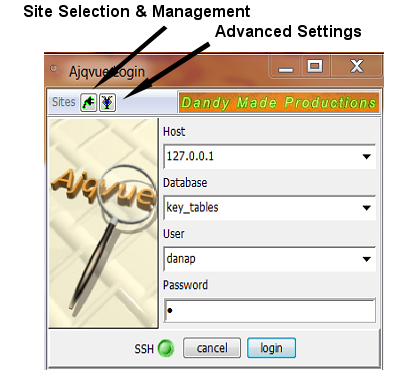
Upon first running the Ajqvue application the user will be presented with a login access. The basic login requires four inputs to be provided in order to gain access to a database. Figure 1. below shows the login window with the textfields that require proper input. The Host input is the server that is running the database. Ex. localhost, 127.0.0.1, 216.123.456.001, mysqlserver.net, dandymadeproductions.com. A database must also be specified because a database server can have several databases associated with it. Ajqvue provides for the access of only one database at a time. Multiple processes of the program may be used to access more than one database at time. The database entry may also be used to provide additional parameters to effect the connection, such as for PostgreSQL "myDB?loglevel=2". The last two entries in the login are the User and Password inputs to gain access to the database server. At the top of the login access is a toolbar that allows saved site selection, Connection Manager site management, and the advanced options for connections. The advanced options portion of the login interface has four additional parameters, Driver, Protocol, SubProtocol, and Port. The default installation of Ajqvue comes with example entries for the Derby, H2, HyperSQL, MariaDB, MS SQL, MySQL, Oracle, PostgreSQL, and SQLite databases for these parameters. It will be obvious for the Driver and SubProtocol entries which selection is correct, because the contents contains the database name. Derby, H2, HyperSQL, MS SQL, MySQL, Oracle, PostgreSQL, and SQLite all share a common entry for Protocol, jdbc, but the ports are not as such; Derby's port is 1527, H2's 9092, HyperSQL's 9001, MS SQL's 1433, MySQL's & MariaDB's 3306, Oracle's 1521, & PostgreSQL's 5432. SQLite and MSAccess actually needs no port number since it is file oriented but, Ajqvue requires a port entry so the arbitrary number 0000 was chosen for the example entry. * Beware these are just the default ports for these databases. An administer of the database may change these default configurations. Also if you are updating the Ajqvue application your existing saved sites in the .ajqvue.xml file will not be over written with a new ajqvue.xml reference file from the installation. The implications is you will not see any new example parameters for additional databases supported. You may have to manually open the reference ajqvue.xml file with a text editor in the installation directory to view these examples parameters or review Appendix B.
Connection Manager
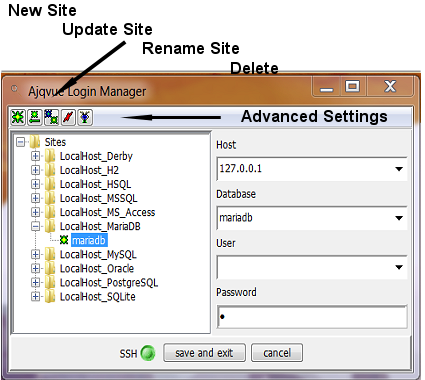
The Connection Manager for Ajqvue allows the user to save site parameters that may then be loaded from the login access. When activated from the login access the user will be presented with the interface shown below in Figure 2. At the top of the frame are five toolbar menu items, New Site, Update Site, Rename Site, Delete, and Advanced Settings. The New Site action will create a new site that takes the current entries in the 'Host', 'Database', 'User', 'Password', 'SSH' button and 'Advances Options' fields. A dialog will request the name of the new site. * A new site will not be created if the user has selected an existing Tree site database entry. Either select the top 'Sites' node or just a site, ex. 'LocalHost'. The selection of a site on the tree and the New Site action will create a new database entry for that selected site. A new site sub-tree item always takes the name of the database field.The Update Site command allows an existing site database selection to be updated with the current field entries. A Rename Site action allows an existing site name and host to be changed. The user will be prompted for the new site name. Delete does just that, it will remove not only the site database, but also the whole site selected. ! No confirmation is required for deletion. The Advanced Settings menu item allows the user to have access to the fields 'Driver', 'Protocol', 'SubProtocol', and 'Port'. These entries are mainly associated with what type of database Ajqvue will attempt connection. * At this time Ajqvue has only been tested with the Derby, H2, HyperSQL, MariaDB, MsAccess, MS SQL, MySQL, Oracle, PostgreSQL, & SQLite databases. Once done with manipulating site entries than either Save/Exit or Cancel to close the Connection Manager.
Interface Overview
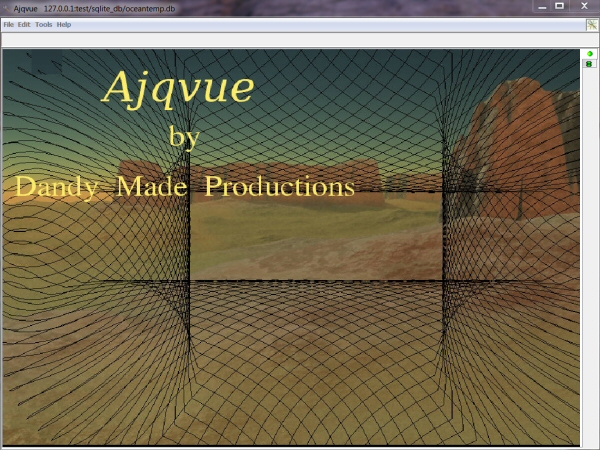
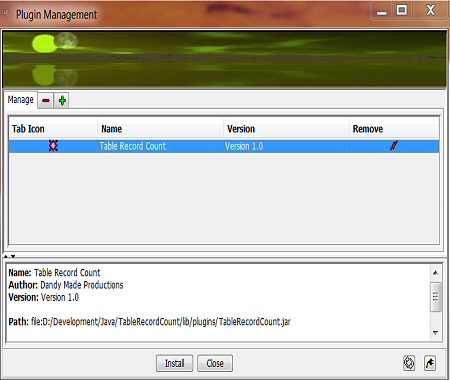
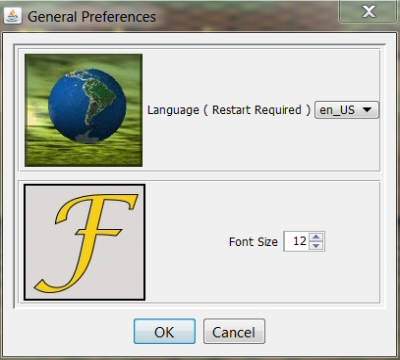
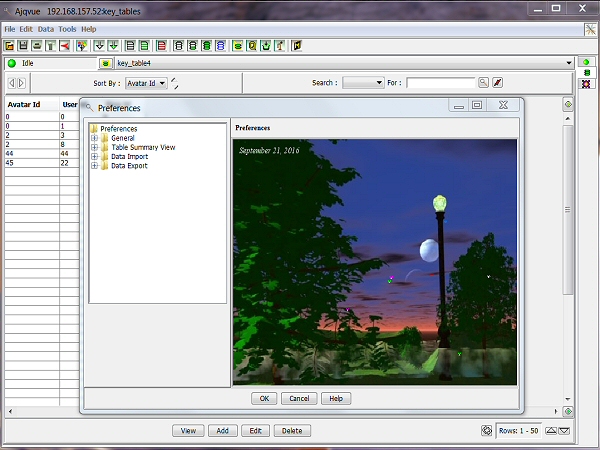
The Ajqvue application's main frame shown in Figure 3. is modular in nature and upon first appearing presents the users with the Dandy Made Productions identification view. All modules in the form of plugins are accessable via the tab on the right hand side. There will always be the Dandy Made Productions promotional view tab, and at a minimum a Database Tables tab. Beyond these two tabs will be plugin modules which the application will load dynamically when first executed or loaded manually by a user via the Tools | Plugin Management menu. The Plugin Management tool shown in Figure 3a. allows the removal of the current session plugins for those loaded dynamically from the lib/plugins directory, or permanent addition/removal from an alternate directory. The main frame also provides via the Edit | Preferences menu, Figure 3b., access to the language control setting and changing the application's font size. A new language setting will require the application to be restarted. Generally font changes will take place, but may not propagate down the to all components in the interface until a restart is also initiated.
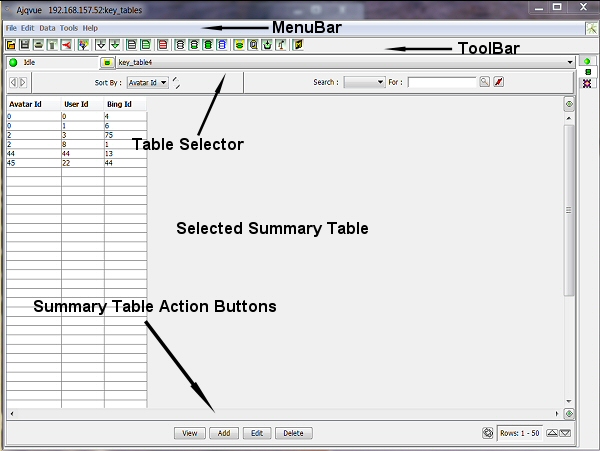
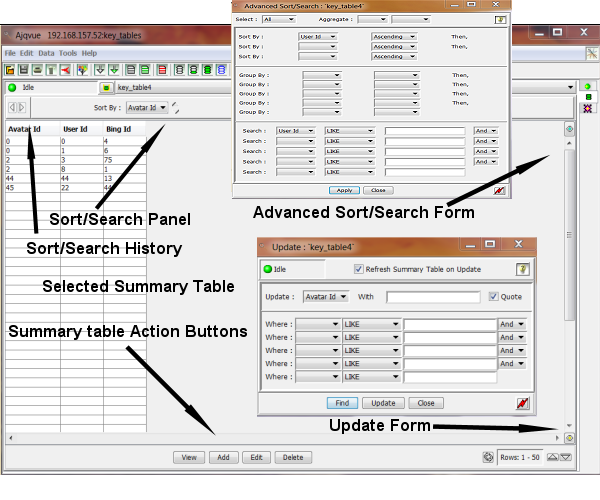
The interface for the Database Tables tab, the core feature of the application, is generalized to display a basic overview of the tables in the selected database. Figure 3c. below highlights the specific areas of the module. At the top of Database Tables module is the menu bar and tool bar that allows specialized command execution that performs various operations in the application or acts on the selected table. The pull down menu just below the tool bar in the interface allows the selection of one of the tables in the database. To the left of the pull down menu for table selection is the current table state and Query Bucket add button. Each selected table has a summary view of the data in the table along with sort and search panels at the top. Each entry in the Summary Table may be highlighted then viewed, edited, or deleted. The panel below the Summary Table provides buttons to perform these operations in addition to adding an entry, paging through the table and refreshes to the application's view of the data in the table.
The menu/tool bar allows access to several commands that may be utilized by the user. The File | Open allows the loading of a table state configuration and likewise the File | Save/Save As affords the selected Summary Table state saving. File | Print, allows the ability to print the current selected tab summary as seen by the user. Most users would call this a screen print, because what you see in the summary tab is what will be printed. If the desired data is not visible in the Summary Table then scroll down and perform another print to output this data. The File | Page Format, will access a standard printer page format setup where the size, orientation, and margins may be changed. The File | Exit, command will terminate the application. Of course the application may also be closed by pressing the standard close button in the upper right hand corner. The Edit | Cut, Copy, and Paste, menu commands are for manually editing text in the text areas of the application. Shortcuts for these commands are Ctrl+x, Ctrl+c, and Ctrl+v respectively. These commands may also be accessed by way of a right mouse button click. * Note the right click of the mouse button is given focus in the panel not the text areas. So if you are having trouble with the pop up, move slightly off the text area, but still within the panel and then right click. The Edit | Preferences, command will allow the user to access various options that may be configured for the application. Figure 4. indicates the panel that will be provided to the user and is discussed fully in Appendix A.
The Data | Import, and Export tool bar commands provide a means to manipulate the database tables' data outside of the normal context of Ajqvue. The Data | Import | SQL Dump provides the means to import SQL statements into the connected database. The Data | Import | CSV File provides a mechanism to import data into the current selected table that may have been exported via a spreadsheet application. ! Both of these commands may change data or even fields in the table(s) and possibly overwrite all data in the table(s) depending upon the imported file. The Data | Export | CSV | Table command provides the ability to export to a file the complete selected table with a predetermined delimiter separating the fields. The user may also export the summary of the existing selected table by executing the Data | Export | CSV | Summary Table function. One may also export the Summary Table data in PDF format via the Data | Export | PDF | Summary Table command. A database table may also be exported in SQL format by the Data | Export | SQL | Table/Summary Table. Again either the whole table or only the Summary Table data will be exported. An exported SQL file may be used as a backup or used to recreate the table. The Data | Export | SQL Format | Database/Database Scheme allows the current selected database to be exported in full or just the scheme. This option can provide a backup of the database or to fully replicated the database via a SQL import to another server. ! The preferred procedure for backup of all critical data should always be the database's own dump tool.
Under the menu for Tools one will find several items including the Tools | SQL Query Bucket, Figure 4a., which will allow the user to store queries directly from a Summary Table's current state. Once stored queries may be organized, edited, and saved to facilitate usage with Ajqvue's plugin architecture. With the proper design a plugin should accept a drop of a query from the bucket to allow processing of table data according to the functionality provided by the plugin. The Ajquve Tools | Query Frame toolbar command provides a generic query console frame that may be used to execute SQL statements directly. The query frame tool provides a means to build complex queries like those associated with running the database's console tool. The Query Frame can be very helpful for those wishing to generate complex report data. Figure 5. below shows the Ajqvue toolbar query frame.

The Tools toolbar has two other commands, Tools | Reload Database and Tools | Search Database. The first allows the reloading of the database without exiting the application. The application will reconfigure itself to reflect any changes in the database that may have occurred after the initial login. The search database command will open a window frame like that shown in Figure 6. below which allows the general search for a key phrase or character sequence in the database tables. Depending on the user's configuration of the Ajqvue application and database privileges the application may also have a Schemas toolbar menu item. This menu item allows the control of which database schemas are selectable and acted upon by the application. The final tool bar command Help | Manual, Legal, Release Notes, and About provides access to this manual, legal documentation, a README file and information about the build of the software. The build information is valuable subject material on your version of Ajqvue. The build Id is giving in the format of year, month, and day.
General Summary Table Overview
Each table view in Ajqvue has essential the same user interface. Figure 7 below outlines this Summary Table view. At the top of the Summary Table is a panel that provides a generalized sort and search with history indexing. In the sort panel each table has a specific set of fields/columns that may be used to sort the table summary in the center of the view. All fields that a user has access to will be available from the pull down menu for sorting. Likewise in the search panel all fields that are viewable by the user will be available to be searched according to the entry in the text area to the right of this pull down menu. Percent, %, characters are automatically inserted at the beginning and ending of the text by the Ajqvue application in the phrase to be searched. Most databases treat this character as a wild card so that a generalized search may be automatically obtained. As an example to search for the word "dog" in a particular column field one could either enter "dog" or "do". Of course many other entries with "do" in the latter case will also appear as a resultant search match. If the column to be searched is left blank and a key word/phrase is entered then all columns will be searched for the entry. An advanced sort/search may also be be applied on the selected table by activating the Advanced Sort/Search Interface. The advanced sort/search form is very similar to the general sort/search input, but does not add any wild cards to the search phrase. LIKE searches use an exact match. The Advanced Sort/Search also includes an Aggregation and GROUP BY feature. For additional information about advanced sort/searches activate the help frame through the button with the question mark at the top right. The final panel in the summary tab that will be of use to the user will be the panel at the bottom. The panel contains several buttons that allow the selected table entry to be viewed, edited, or deleted. A new entry to the table may also be added and the whole table summary view forwarded or reversed through row entries. The Summary Table normally just shows fifty entries at one time. The row label in the bottom right of the panel indicates the position in the selected table that the Summary Table is displaying. If the selected table has more than than fifty entries press the down arrow button to advance to the next fifty entries in the table. The up arrow button will index back to the previous fifty entries in the table. A refresh of table data is accomplished through the button to the left of the row indicator. Besides viewing, and editing table entries one can also update rows via the Update Form. The Update Form allows the updating of a single field in multiple rows at one time.
Summary Table
The Summary Table in the center of each tab shows the entries that are stored in the database for the selected table. The table is similar to a spreadsheet where each row represents a record of data and each column holds attributes of that record. Each table will has its own unique columns/fields. Columns in the Summary Table can be hidden from view by way of the Edit | Preferences tool bar command as describe in Appendix A. Columns may also be moved to different positions in the table by hovering over the desired field heading and pressing the left mouse button and then dragging it to a new position. A moved column will only be in effect for the current session started by the user. The Summary Table allows selections to be made by the user by a left mouse click over an entry. Multiple selections may be made by holding the shift key down and selecting another entry either above or below the current selection. Multiple selections allow more than one entry to be deleted at one time, but only the first selected row in the table will be viewed, or edited. Once a selection has been made the arrow keys or numerical keypad may be used to move to another entry either above or below the current selected row. Horizontal and vertical scrollbars allow the viewing of data that is not within the screen size of the window. The short cut keys, Ctrl+c and Ctrl_v, may be used to copy/paste selected entries/contents in the Summary Table to or from the clipboard.
Item View Form
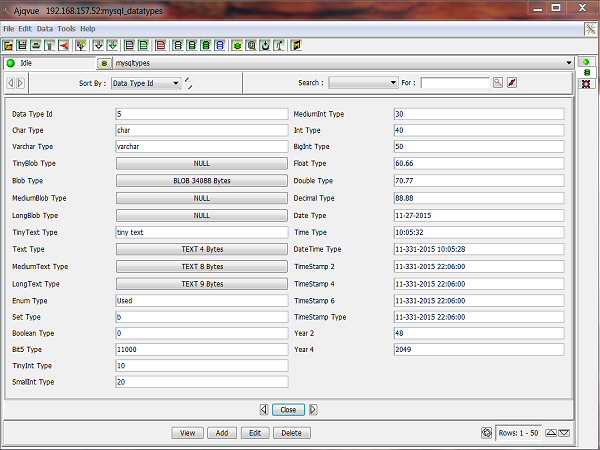
The summary item view form may be obtained by highlighting a row in the Summary Table and pressing the View button in the bottom panel or by pressing the combination Alt+v. Once this is done the current data for this entry will be read from the database. The item view form shows all fields in the table that the user has access to regardless of the user's Edit | Preferences | Table Summary View options. The item view form shows ARRAY, BIT DATA, BLOB, BYTEA, BINARY, CLOB, LONG, LONGVARCHAR, RAW, TEXT, MEDIUMTEXT, and LONGTEXT fields in the table by a button with the byte size or element count as the label. Left clicking on a BLOB field button or one of the other type binary data fields will allow the saving of the data to the user's local hard disk. Activating a text or array field button will allow the view of the contents of the field with the option to save to the the hard disk. Once the view form is open the previous or next entries in the Summary Table may also be viewed by pressing the buttons to the left or right of the Close button respectively. Viewing rows in this manner may also be achieved with the keyboard left and right arrow keys. Once the user is finished with the view form then the Close button at the bottom of the panel can be used to revert back to the Summary Fable view. Figure 8. below profiles the item view form.
Item Add/Edit Form
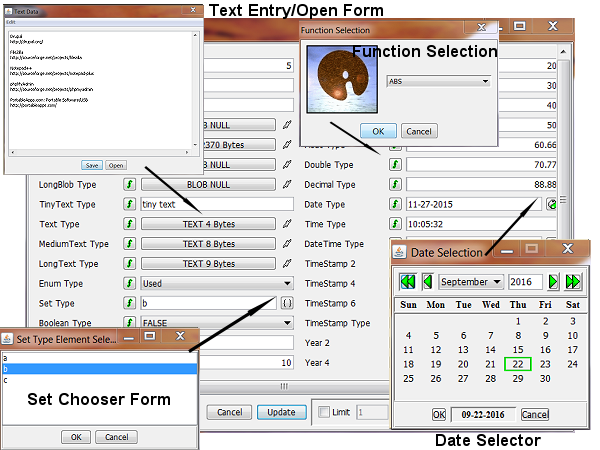
The add/edit form for Ajqvue provides the user the ability to add or edit individual entries in a database table. Each table will have a slightly different add/edit form, but essentially each field the user has access to will be available for data entry. The add/edit form shown below provides a visual of a typical form for data entry in Ajqvue. Generally most fields require manual entry of data, into text fields, but some fields like Text, Array, Boolean, Enum, Set and Date may have this option but also have alternative entry methods. The Enum field in the add/edit form is a pull down menu that contains selections that have been defined by the table description. The Set field data may be entered directly with commas separating elements, or elements may be chosen by way of the Set Chooser Form that is activated by the Set button to the right of the field. As the Set field, Date & Datetime fields may be entered directly in the text field or chosen via the Date Selector. The default date format for Ajqvue is 'MM-DD-YYYY', but may be changed via the Edit | Preferences | General | Options. Text, Long, LongVarChar, MediumText, LongText, and Array fields are either entered directly in a Text Entry Form or selected from a file. The form's entries for these possibly large content type fields are represented by buttons that activate the editor pane. Blob, Bytea, Binary, CLOB, and RAW type fields will be represented in the add/edit form also by a button. Clicking on one of these fields' button will allow the selection of a file from the user's local hard disk. Once selected the file's byte size should appear as the label indicating data being present. To remove binary, array or text data from a form field select the Delete Button to the right of the entry. Upon committing the data will be set to 'NULL'. * Note if the database table does not except 'NULL' as a default for the field then create an empty file and select it as your data, BLOB/TEXT 0 Bytes. Each field in the add/edit form may also have a function operator applied to the contents of the entered data. The function operation is activated by the button to the left of each field in the form. Select the desired operation then press the Ok button. The functions in the Ajqvue application are initially read from a reference 'XXX_functions.txt' file in the installation directory. Each database will have its own function text file. A copy of that file is placed in the same home directory as the 'ajqvue.xml' file. If a function is not available that is desired then the user may edit the copied function file to provide the function desired. The next time the function form is activated then the new function should be available. User created functions can be made accessible via this method.
The tab key on your keyboard provides the ability to advance through each entry field starting from the upper left, down, then to the next set of fields to the right and down again. Once the data has been entered then the Add or Update button at the bottom of the form can be used to commit the entry to the associated table. * Notice the default focus for the form is the Add/Update button. The pressing of the Enter key will activate the committing of the current data. Once entered many of the fields will be checked for valid data prior to a commit so if an alert window appears read the information carefully to determine the invalid entry, close the alert and make the necessary corrections then attempt again to commit the data. At anytime a user may either just close the window frame or press the Cancel button to abort the operation.
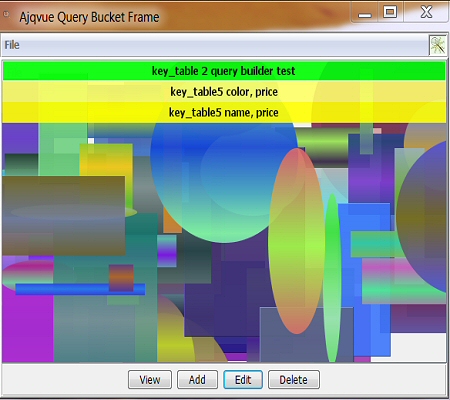
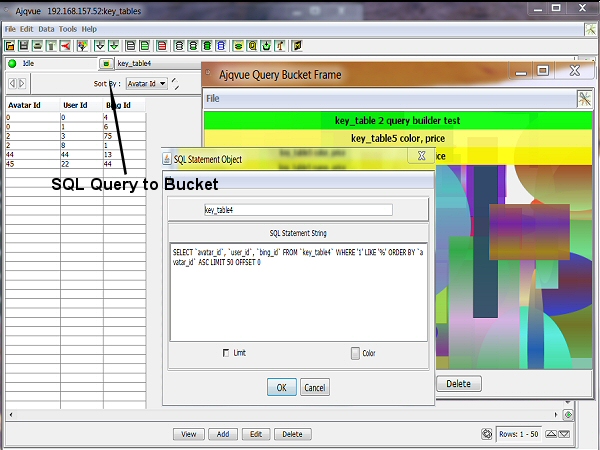
Query Bucket
The Query Bucket in Ajqvue is accessible via the menu Tools | Query Bucket or via the addition of a query from the Summary Table interface. The Query Bucket provides a method for the user to create, organized, and save queries. Once the queries are listed in the Query Bucket a user may drag and drop one into a plugin panel. The plugin, if properly designed, will use the resultant data as determined by the dropped query to process data according to its functionality. The addition of a query to the Query Bucket takes place via a dialog as displayed in Figure 9a. below. The dialog allows the user to give a general description to the query along with controlling the LIMIT aspect, and color as presented in the Query Bucket list. If the LIMIT button is selected, depressed, in the dialog then any LIMIT stipulated in the query will be maintained. Otherwise the LIMIT aspect of the query will be removed on a drop or any further editing. Once a query is added to the bucket it will appear in a list format of the Query Bucket interface. Queries in the list may be organized by moving and placing them in any order as desired. Just drag the query to a new position in the list. The buttons at the bottom of the Query Bucket frame allows the viewing of the details of a stored query, editing or deletion. The complete list in the bucket may be saved by way of the File | Save or retrieved back into the bucket with File | Open. The Ajqvue application when closed will automatically save the current Query Bucket list and restore this saved list when the application is once again started.
Query Frame
The Query Frame in Ajqvue is accessible via the menu Tools | Query Frame. The Query Frame may be used to create and run complex queries on the current connected database. Figure 10. shown below outlines the major areas of the the Query Frame. At the top of the window frame is the text entry area for query input. Once a SQL statement has been entered than activate the Execute button. If there is no errors in processing the query then a resultant Summary Table of data will be displayed in the center of the panel. The text area at the bottom of the frame will output any errors that are generated by the database in trying to execute the statement. Review the error output if needed and make any necessary corrections in the Query Input and execute the query again. Once a SQL statement is execute and the Summary Table is present then each column's header may be used to sort the current data.
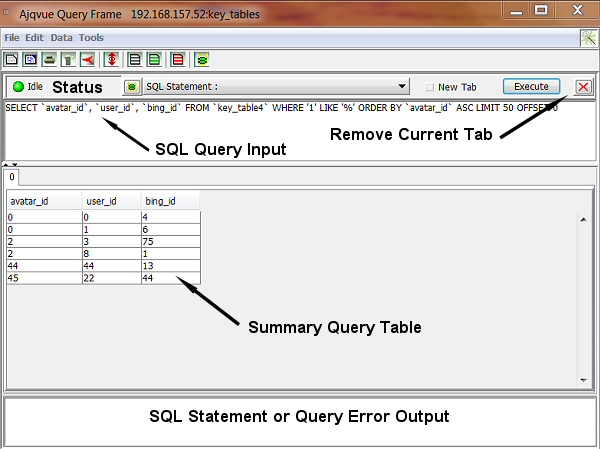
The Query Frame may have multiple tabs with each having independent queries with data. Each time a query is entered and the Execute button is activated with the New Tab checkbox pressed then a new tab in the Query Frame will be created with the resultant data. The Query Frame is different with regard to connections to the database than the rest of the Ajqvue application. Normally Ajqvue opens and closes connections to the database as needed during the processing of events such as record advancement and entry views. In the Query Frame, Query Statement, mode one connection is maintained as long as the window frame is open and the connection has not under gone a timeout condition. Each tab's query in this mode is the same active connection to the database. What this achieves is the ability to create complex queries on tables in the database that may evolve multiple joins in a temporary table for instance. A new query may access that temporary table to build further on refinement of analysis of the database information. The toolbar at the top of the Query Frame may be used to open/save script to/from the query text area, print as in the main application, edit the Summary Table row size, and export the data in the format of either PDF or comma delimiter values. The Ajqvue Edit | Preferences options panel allows the control of the delimiter used with the export of data and PDF report format options.
Search Frame
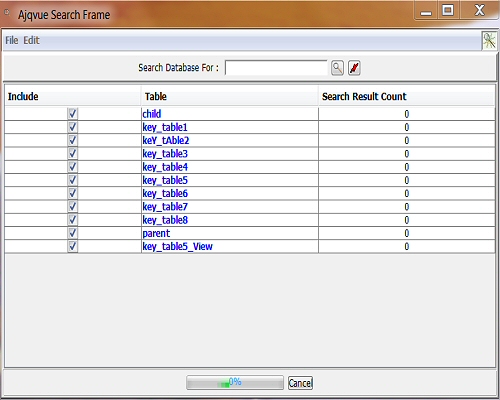
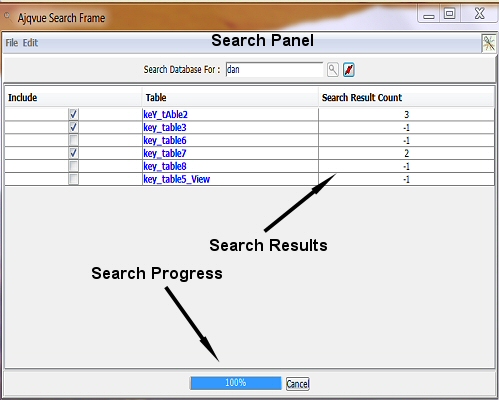
The Search Frame may be used to enter a word or sequence of words that may then be used in a search of all tables' fields contents currently available from the selected schemas of the database. Upon first activating the search frame a window view will be presented that has a panel for search entry, a list all tables that will be searched in the database, and a status bar. The table list is composed of three columns. The first allows the inclusion/exclusion of the tables in the search. The second column in the center gives the tables' names and the right column indicates the number of entries that match the search, the value zero on first initialization. A status progress bar is available at the bottom of the window with a Cancel button to abort a search. Once a search is initiated then each table on the list will be queried for the contents of the search entry field. Because of the binary nature of fields in databases, Blob, Bytea, etc. these fields will be excluded from being searched. A completed search will only list the tables that provided a positive match and tables where a problem occurred or the table was not included, Search Result Count equals -1. The user may view the results from the search for each table in the Ajqvue application's main window frame by selected a table in the Search Frame list and left-clicking on it. A popup menu is provided in this frame like all frames in Ajqvue that allows the cutting, copying, and pasting of data into text entry fields. In addition a popup is also provided for the table list that allows all tables to be selected or unselected for the search. The list table may be copied via the popup menu or the key sequence Ctrl+c. Once a search has been completed the users must clear the results by using the clear button in the search panel. If the database is reloaded or the schemas list changed it is best to close the Search Frame and restart it with any tables that may have changed to properly conduct the search. Figure 11. below provides a view of a Search Frame that provided a positive search results for the term "dan". The key word or phrase is an exact match for searches and some database do differentiate by lower or upper case characters.
Appendix A. Ajqvue Database Tables Preferences Menu
The Database Tables preferences options menu in Ajqvue is accessed via the menu command Edit | Preferences. Once activated the user will be presented with a window that has a tree type folder selection menu on the left side of the frame. As the tree items are expanded and selected via the mouse the various options for the particular area will become visible in the right side of the frame. The preferences options all the control of General, Table Summary Table, Data Import, and Data Export options.
General Options
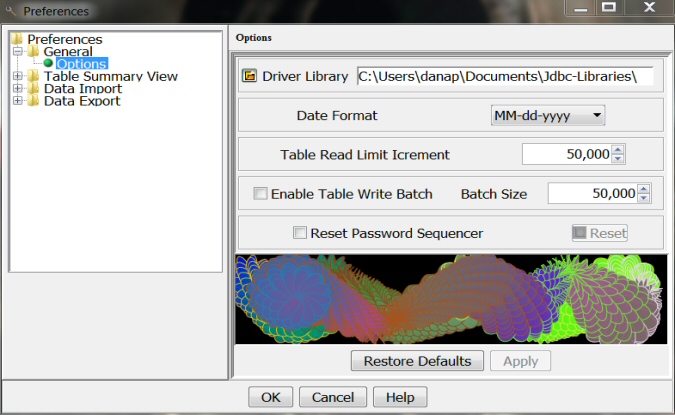
Under the heading of General | Options is a panel that allows the setting of the Driver Library, Date Format, Table Read Limit Increment, and Batch Writes. The Driver Library is the user's directory where JDBC drivers may be be placed for loading to facilitate connecting to the database. The Date Format selected will be used by Ajqvue for all views and search patterns. The Table Read Limit Increment determines the limitation that will be placed on reading table rows at any one time. A read could be requested for instance on CSV dumps to all rows in a table. In so doing possibly millions of rows could be dumped. The read limit will insure that only the amount specified is read at any one time then an increment will take place to continue. In so doing the application will dump more slowly, but not run out of memory in processing the request. The Batch Writes performs the same limiting processing except for writes to the database in imports of data. Once a selection is made then either press the Apply or OK button for the preferences to take place. For the Date Format only the current selected Summary Table view will be updated immediately. A manual refresh will need to be performed for other Summary Tables. Figure 12. below highlights the frame with the options for selecting these parameters.
Summary Table Fields
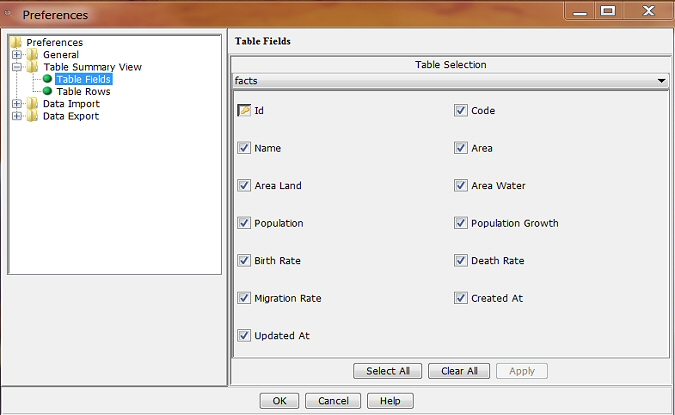
Under the heading of Table Summary View | Table Fields is a panel that allows the current session of the application to control the fields that are displayed and exported for each Summary Table view. At the top of the form is a pull down menu for selecting each table and the form beneath allows the inclusion/exclusion of fields. Once selections are made then either press the Apply or OK button. The selected Summary Table view will be updated immediately. Figure 13. below highlights the frame with the option for selecting fields in each table.
Summary Table Rows
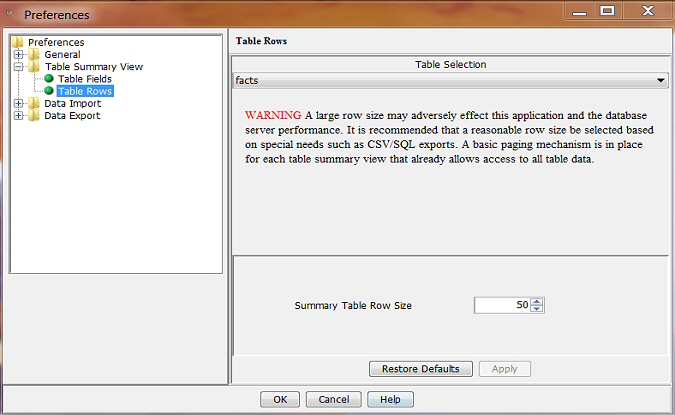
The other option available for control with the table summary view is the Table Summary View | Table Rows shown in Figure 14. below. The option once selected again presents the user with a table selection pull down menu and panel for determining the number of rows, entries, that will be displayed for the selected table in the summary view. The selected number of rows also controls the amount of data that is exported during either the Data | Export | CSV Format | Summary Table or Data | Export | SQL Format | Summary Table. A warning is given in this panel about care in selecting the number of rows to be used. ! Note, a large row size can have an adverse effect on the performance of the Ajqvue application, a network, and the database server.
Data Import CSV
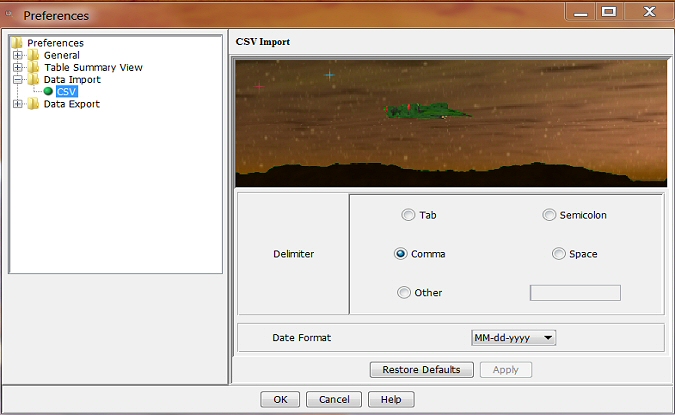
The Preferences menu in addition to allowing options to be set for the Summary Views also has various options for the import/export of data. The Data | Import | CSV options panel allows the selection of the delimiter character and date format. Various spreadsheets often allow the control of the delimiter character when exporting worksheets as text; So this panel's options will help when importing data from those applications. Figure 15. below shows the selection panel as it is displayed in the Preferences menu.
Data Export CSV
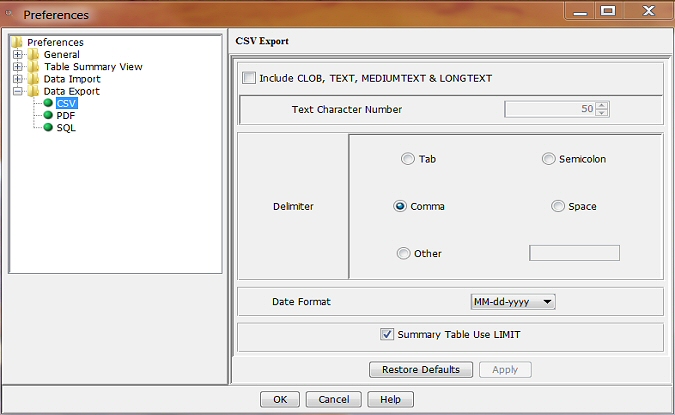
The CSV, comma separated values, data output options accessed in the Preferences window under Data Export | CSV allows the user to control the delimiter for separating fields, date format, Summary Table limit, and the control of Text fields in the output to a file. Normally the Data | Export | CSV Format | Table will exclude Clob, Text, MediumText, and LongText fields from being output during an export. The string 'Text' will be substituted in place of the content in these fields. The reasoning being that these fields can hold from 0 to 4GB of characters for some databases. A database with these field types may well have complete documents that would preclude trying to format such entries in for instance a spreadsheet import. The fields may though be included by the user by selecting the Include CLOB, TEXT, MEDIUMTEXT, & LONGTEXT checkbox. The user may then control how many character will be export for these fields into the output file. The CSV control in the Preferences menu has no effect on the Data | Export | CSV Format | Summary Table output. Rather all fields and row entries present in the selected summary view table will be exported. To control fields and the number of entries exported in a summary view use the Preferences menu Table Summary View | Table Fields/Table Rows options. Figure 16. below shows the Preferences menu Data Export | CSV options panel.
Data Export PDF
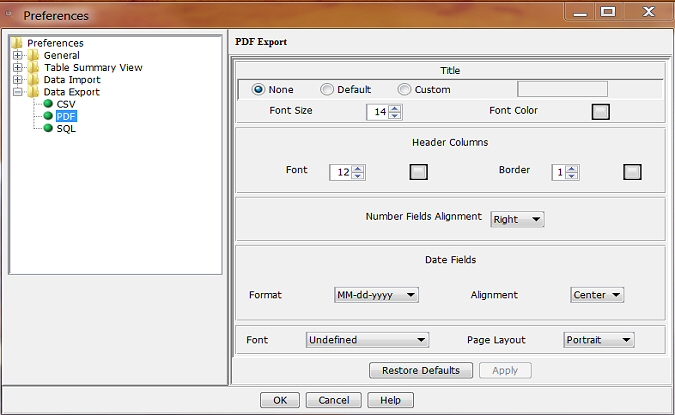
The PDF, portable document format, export options panel allows the user to create a controlled export of the current selected Summary Table to a PDF file. At the top of the panel is the ability to select whether or not a title for the page will be produced. If so then the font size and color of that title may be specified. Under the Header Columns one may control the font size, and color for the table's field names. The border color surrounding these field names can also be selected in addition to the the border size. Any character type fields in the table will be left justified, but numerical fields can be manipulated via the pulldown menu combobox, Number Fields Alignment, for left, center, or right justification. Like numerical fields the Date Fields can have the alignment specified in the panel, but also have the format dictated. The default format for dates is set for month, day, year. The final option for the PDF export is the control of the font and page layout of the report. The font will allow the user to select a font that may be embedded in the PDF document. The selection of one of the Freefonts will allow unicode characters to be displayed in the report. At anytime the form like others in the Preferences Frame may have the default settings returned by the Restore Defaults button. To activate the changes for the PDF formatted file export press the Apply button or if finished with the preferences selections activate the OK button. The PDF Export options panel is shown below in Figure 17.
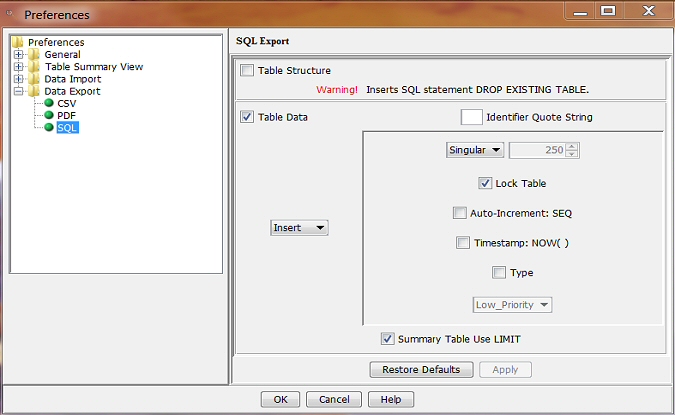
Data Export SQL
The final option's control panel in the Preferences menu is the Data Export | SQL. The SQL panel shown below in Figure 18. allows the user to fine tune SQL statements exported during a Data | Export | Table/Summary Table command. The various options in this panel can be used to create all the normal SQL statements for inserts and updates. At the top of the panel allows the selection of exporting the table structure and the bottom portion the type of SQL statement to be generated for the data. Insert, replace, and update SQL statements along with additional variants of the these commands can be generated. Table 1. and the information below gives examples of the various insert/replace variants Singular, Plural, and Explicit along with the support in what databases. Its best to review your requirements in a SQL statement reference and then experiment with these settings to achieve the desired results needed for the exported data. Large data sets in a table that includes Blob/Binary fields are best exported using the Explicit statement because this option creates separate SQL statements that may be parsed for execution. The Locked selection allows the insertion of a lock statement for the effected table. The Identifier Quote String allows the selection of the character that will be used to highlight table names and fields. Often different databases use dissimilar characters for identifying/quoting table and field names. With this option one could perhaps compensate for this dilemma when generating SQL statement tables that will be used on an alternate database then the one being export from. ! The preferred procedure for backup of all critical data should always be the database's own dump tool. The Summary Table limit option will allow users to control whether or not the current selected row limit is imposed or not during Data | Export | Summary Table only.
Singular Example:
INSERT/REPLACE INTO "bigInt_types" ("data_type_id", "bigint_type") VALUES (NULL, '5');
INSERT/REPLACE INTO "bigInt_types" ("data_type_id", "bigint_type") VALUES (NULL, '-65');
Plural Example:
INSERT/REPLACE INTO "bigInt_types" ("data_type_id", "bigint_type") VALUES (NULL, '5'),(NULL, '-65');
Explicit Example:
INSERT/REPLACE INTO "bigInt_types" SET "data_type_id"=NULL, "bigint_type"='5';
INSERT/REPLACE INTO "bigInt_types" SET "data_type_id"=NULL, "bigint_type"='-65';
| Expression Type | Derby | H2 | HSQL2 | MSAccess | MS SQL | MariaDB | MYSQL | Oracle | PostgreSQL | SQLite |
| Singular | Yes | Yes | Yes | Yes | Yes | Yes | Yes | Yes | Yes | Yes |
| Plural | Yes | Yes | Yes | No | Yes | Yes | Yes | No | Yes | Yes |
| Explicit | No | Yes | No | No | No | Yes | Yes | No | No | No |
Login Parameters
| DB System | Type | Database | Driver | Protocol | SubProtocol | Port |
| Derby | Server | dbName | org.apache.derby.jdbc.ClientDriver | jdbc | derby | 1527 |
| File | path/dbName | org.apache.derby.jdbc.EmbeddedDriver | ||||
| Memory | memory:dbName | |||||
| H2 | Server | tcp:dnName | org.h2.Driver | jdbc | h2 | 9092 |
| File | path/dbName | |||||
| Memory | mem:dbName | |||||
| HSQL | Server | dbName | org.hsqldb.jdbcDriver | jdbc | hsqldb:hsql | 9001 |
| File | file:path/dbName | |||||
| Memory | mem:dbName | |||||
MSAccess |
File |
dbName |
sun.jdbc.odbc.JdbcOdbcDriver |
jdbc |
odbc |
0000 |
MS SQL |
Server |
dbName |
com.microsoft.sqlserver.jdbc.SQLServerDriver |
jdbc |
sqlserver |
1433 |
MariaDB |
Server |
dbName |
org.mariadb.jdbc.Driver |
jdbc |
mariadb |
3306 |
MYSQL |
Server |
dbName |
com.mysql.jdbc.Driver |
jdbc |
mysql |
3306 |
Oracle |
Server |
dbName |
oracle.jdbc.driver.OracleDriver |
jdbc |
oracle:thin |
1521 |
PostgreSQL |
Server |
dbName |
org.postgresql.Driver |
jdbc |
postgresql |
5432 |
| SQLite |
File |
path/dnName |
org.sqlite.JDBC |
jdbc |
sqlite |
0000 |
| Memory |
:memory:dbName |